


Unloader leaks are usually caused by a faulty check valve.
The flow capacity charts for all of our ASME safety valves are shown under the Products section of our web page.
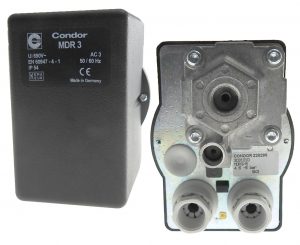
Cut-out pressures are adjustable from 60 PSI to 250 PSI with the standard silver spring. The differential (difference between cut-out and cut-in pressures) is typically set at the factory at roughly 15% of the cut-out pressure. This is usually a suitable differential and will not normally need to be re-adjusted.
We offer a wide range of pilot valves and unloading valves for many applications:
Pilot Valve
The P25 valve is an adjustable pilot valve with a ¼” NPT inlet and an ⅛” NPT outlet port which can be used to pilot head unloaders or used with a throttle control to slow down the engine during cut-out. The P25 pilot valve has a 3/8-16 UNC mounting boss, and comes standard with an unloading sleeve for gas engine warm up. Options include a toggle for one hand unloading, a lock out thumbscrew for dual systems control, and a ¼” nipple for the inlet. Refer to the Pilot Valve section of our Products web page for details on the cut-in and cut-out ranges.
Venting Pilot Valve
The P25V unloader incorporates all of the P25 options along with a vent valve to unload the compressor discharge after cut-out. The vent valve on the P25 has a ¼” compression fitting which must be connected to the compressor discharge line. The P25V offers all of the same options as the P25, except for the mounting boss.
Venting Unloader with Check Valve
We offer a complete line of self-contained Continuous Run Vent unloaders. These valves incorporate an adjustable pilot valve, vent unloader, and check valve that perform all of the functions required for continuous run compressors. Options include a ¨û” NPT tapped port for throttle control as a gas engine, a toggle unloading lever for one-hand warm up, and a vent port muffler. Depending on flow and space requirements, we offer the Mark II, Mark III and Mark IV series of valves. Visit the Products section of our web site to find out which valve is right for you.
We offer two standard types of pressure relief devices for air:
- A safety relief valve, or pop-off valve, is set to pre-determined pressure using a spring force to counteract the air pressure force. When the force created from the air pressure becomes greater than the spring force, the valve ‘pops’ fully open and vents air to the atmosphere. Safety relief valves are sized in such a manner that the valve will always have a greater flow capacity than the source creating the air pressure (i.e. an air compressor). The valve will remain open until a reseat pressure is reached. This reseat pressure varies with valve type and is usually between 35% to 75% of the set pressure. Control Devices have eight series of valves that are manufactured in accordance with Section VIII of the ASME Boiler and Pressure Vessel Code. Control Devices also manufacture a wide range of non-code valves. See our Products section for information on the valve types.
A relief valve is set to a pre-determined pressure with a spring force counteracting the force created by the pressure from the air. When the force created from the pressure of the air becomes greater than the force of the spring, the valve will start to open and flow to atmosphere. As the pressure continues to increase, the valve will open further, allowing more flow. As the pressure decreases, the valve will close near the pressure at which it opened.
We offer a wide range of pilot valves and unloading valves for many applications:
Pilot Valve
The P25 valve is an adjustable pilot valve with a ¼” NPT inlet and “1/8” NPT outlet port which can be used to pilot head unloaders or used with a throttle control to slow down the engine during cut-out. The P25 pilot valve has a 3/8-16 UNC mounting boss, and comes standard with an unloading sleeve for gas engine warm up. Options include a toggle for one hand unloading, a lock out thumbscrew for dual systems control, and a ¼” nipple for the inlet. Refer to the Pilot Valve section of our Products web page for details on the cut-in and cut-out ranges.
Venting Pilot Valve
The P25V unloader incorporates all of the P25 options along with a vent valve to unload the compressor discharge after cut-out. The vent valve on the P25 has a ¼” compression fitting which must be connected to the compressor discharge line. The P25V offers all of the same options as the P25, except for the mounting boss.
Venting Unloader with Check Valve
We offer a complete line of self-contained Continuous Run Vent unloaders. These valves incorporate an adjustable pilot valve, vent unloader, and check valve that perform all of the functions required for continuous run compressors. Options include a ¨û” NPT tapped port for throttle control as a gas engine, a toggle unloading lever for one-hand warm up, and a vent port muffler. Depending on flow and space requirements, we offer the Mark II, Mark III and Mark IV series of valves. Visit the Products section of our web site to find out which valve is right for you.
We offer two standard types of pressure relief devices for air:
- A safety relief valve, or pop-off valve, is set to pre-determined pressure using a spring force to counteract the air pressure force. When the force created from the air pressure becomes greater than the spring force, the valve ‘pops’ fully open and vents air to the atmosphere. Safety relief valves are sized in such a manner that the valve will always have a greater flow capacity than the source creating the air pressure (i.e. an air compressor). The valve will remain open until a reseat pressure is reached. This reseat pressure varies with valve type and is usually between 35% to 75% of the set pressure. Control Devices have eight series of valves that are manufactured in accordance with Section VIII of the ASME Boiler and Pressure Vessel Code. Control Devices also manufacture a wide range of non-code valves. See our Products section for information on the valve types.
- A relief valve is set to a pre-determined pressure with a spring force counteracting the force created by the pressure from the air. When the force created from the pressure of the air becomes greater than the force of the spring, the valve will start to open and flow to atmosphere. As the pressure continues to increase, the valve will open further, allowing more flow. As the pressure decreases, the valve will close near the pressure at which it opened.
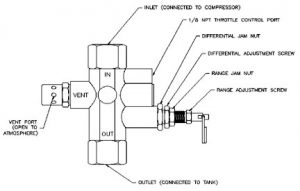
- Loosen only range screw jam nut.
- Turn range screw clockwise to raise cut-out and cut-in pressure levels and counter clockwise to decrease cut-out and cut-in levels.
- Start compressor and note cut-out and cut-in pressures. Make adjustments as necessary using range screw and, when acceptable, tighten range screw jam nut. Proceed as follows, only if it is necessary to make a differential adjustment.
- Adjust the cut-in pressure to the desired level per Steps 1 through 3 as above.
- Loosen differential screw jam nut and turn differential screw clockwise to raise cut-out pressure and counter clockwise to decrease the cut-out pressure. Tighten differential screw jam nut when the desired cut-out pressure is set. Since Step 5 should not change the desired cut-in pressure set in Step 4, the adjustment is now complete.